These gorgeous Black Forest Cupcakes are moist chocolate cupcakes, with pretty swirls of the best buttercream frosting, and topped with juic...
These gorgeous Black Forest Cupcakes are moist chocolate cupcakes, with pretty swirls of the best buttercream frosting, and topped with juicy sweet cherries! My Dad and I love chocolate and cherries, and with Valentine’s Day coming up I wanted to make something special for him, and for you, our sweet readers.
So, I created these beautiful and delicious Black Forest Cupcakes. And, if you happen to be cutting calories (Aren’t we all?) then you’ll love them even more, because these cupcakes are also low in fat, using my helpful little tip!
Our Black Forest Cupcakes are so pretty and would be perfect for your Valentine. The combination of the rich chocolate, extra smooth & creamy buttercream frosting, and the juicy cherries is just fantastic!
They’re really quite easy. Just mix the cake batter, bake the cupcakes, swirl the buttercream frosting and top with cherries!
Preheat oven to 350 degrees F and line 2 muffin tins with 18 cupcake papers. In a large bowl add the cake mix, water, light mayonnaise and eggs, and mix according to the instructions on the cake box. Using a 3 oz scooper fill each cupcake paper approximately 3/4 full.
Ingredients
- 15.25 ounces (1 box) Devil's Food Cake Mix
- 1 cup water
- 9 tablespoons light mayonnaise (1/2 cup + 1 tablespoon)
- 3 large eggs
- Buttercream frosting:
- 1 cup milk
- 1/4 cup unbleached or all-purpose flour
- 1 cup butter, softened
- 1 cup white sugar
- 1 teaspoon vanilla extract
- Topping:
- 21 ounces (1 can) cherry pie filling
Instructions
- Preheat oven to 350 degrees F and line 2 muffin tins with 18 cupcake papers.
- In a large bowl add the cake mix, water, light mayonnaise and eggs, and mix according to the instructions on the cake box. Using a 3 oz scooper fill each cupcake paper approximately 3/4 full.
- Bake in a preheated oven for approximately 18-20 minutes. See note for perfectly moist cupcakes when using lite mayonnaise. Remove from oven and cool 5 minutes before transferring to a cooling rack. Cool completely before frosting.
- Buttercream frosting:
- In a saucepan whisk together the milk and flour. Stir constantly over medium-high heat until thickened. Set aside to cool until the bottom of the pan is warm to the touch. *See notes to quickly cooling the mixture. While the thickened milk mixture is cooling, combine and beat the butter, sugar and vanilla extract in a mixing bowl until light and creamy, about a minute. Take the cooled, thickened milk mixture and give it a stir. Adding a tablespoon at a time to the butter and sugar mixture, beat on medium-high speed until all the thickened milk mixture is added. Then beat an additional minute or two until the frosting is smooth and extra creamy.
- Fill a Wilton Dessert Decorator Plus with buttercream frosting and attach the star tip. Go around the edge of the cupcake to make a pretty swirl pattern.
- Topping:
- Use a fork and place 3-4 cherries on top, making sure to tap off any excess cherry sauce on the edge of the can before adding them to the tops.
- Recipe Notes
- For perfectly moist cupcakes, when using light mayonnaise, make sure to check them a few minutes before the instructions on the cake box recommends. Cupcakes always bake up faster when using light mayonnaise.
- For the buttercream frosting: To quickly cool the thickened milk mixture place the saucepan in the freezer on a hot pad for 5-7 minutes. If the butter is really soft and the frosting doesn't seem thick or stiff enough, place the mixing bowl in the fridge for 10 minutes and beat again until smooth and extra creamy.
- I used a 3-ounce cookie scooper, for bigger cupcakes, and had some buttercream frosting and cherry pie filling leftover. Feel free to use a 2-ounce cookie scooper for the cake batter, to make approximately 24 cupcakes. This way you should use up all the buttercream frosting and cherry pie filling.

thanks done share recipes to : https://mysweetmission.com/2017/02/black-forest-cupcakes.html
They look sooooo good, and they taste even better. I love Baileys! The only time I buy it though is for Christmas and for St Patrick’s celeb...
They look sooooo good, and they taste even better. I love Baileys! The only time I buy it though is for Christmas and for St Patrick’s celebrations. It’s a flavour that I associate with those times and wouldn’t want to change that by using it more often. If you love Baileys like I do you will really want to try my Whipped Baileys and Chocolate Truffles.
I used the gold confetti sprinkles because I thought they would be perfect for St Patrick’s or for Christmas. If you had some gold cupcakes cases they would look great!
When making cupcakes I usually use my handheld mixer because it’s a smaller amount of batter and I find it much easier. I still use my main mixer for the buttercream though because it just makes it so much lighter and fluffier. I used a large closed star nozzle to pipe the swirls fitted into a disposable piping bag. I always use disposable piping bags as I hate to wash the reusable ones! You can see the bottles I always use for my ganache below, I fit them with a very small round nozzle.
INGREDIENTS
- For the cupcakes
- 40 g cocoa powder
- 2 tbsp boiling water
- 3 tbsp Baileys irish cream
- 175 g butter
- 165 g caster sugar
- 3 eggs
- 115 g self raising flour
- 1 tsp baking powder
- for the buttercream
- 200 g butter
- 400 g icing sugar
- 3 tbsp Baileys irish cream
- for the ganache
- 50 g dark chocolate
- 50 ml double cream
- to decorate
- gold sprinkles optional
- baileys chocolate cupcakes
INSTRUCTIONS
- to make the cupcakes
- Preheat the oven to 180c/160c fan oven and add 12 cupcake cases to your cupcake pan.
- In a small bowl add the cocoa powder, boiling water and Baileys and mix into a paste.
- In a large mixing bowl, beat together your butter and sugar until light and fluffy. Beat in the eggs and chocolate/baileys paste. Sift in the flour and baking powder and fold the mixture until just combined.
- Divide the batter between the 12 cake cases and bake in the oven for 15-20 minutes. Check they are cooked by inserting a cocktail stick in the centre. If it comes out clean they are done. Remove from the oven and leave to cool completely.
- to make the buttercream
- Beat your butter until pale and fluffy then gradually add in the icing sugar. Then add in the Baileys and continue to beat the buttercream until it is light and fluffy!
- to make the ganache
- Put the cream and chocolate into a small microwavable bowl. Heat for 45 seconds and then in the microwave without opening the door for a minute. Remove the bowl from the microwave and mix the cream and chocolate to gether until it's combined and glossy.
- to assemble the cupcake
- Put your buttercream into a piping bag fixed with a large closed star nozzle and pipe a large swirl on to the top of each cupcake. Pour your ganache into a piping bottle with a very small round nozzle and drizzle the ganache over each cake. You could also just drizzle it over using a teaspoon if you wanted. Sprinkle over the gold sprinkles if you are using them and your cupcakes are complete!

thanks done share recipes to : makesbakesanddecor.com/recipe/baileys-chocolate-cupcakes/
Course Dessert Dessert Type Cupcakes Prep Time 1 hour Cook Time 22 minutes Total Time 1 hour 22 minutes Servings 20 cupcakes Calories 550 kc...
Course Dessert
Dessert Type Cupcakes
Prep Time 1 hour
Cook Time 22 minutes
Total Time 1 hour 22 minutes
Servings 20 cupcakes
Calories 550 kcal
Author Elizabeth LaBau
These Snickers Cupcakes are over-the-top, in the best way! They're chocolate caramels with a peanut-caramel filling, fluffy peanut butter frosting, and LOTS of chocolate and candy bars!
Ingredients
For the Cupcakes:
7.8 oz all-purpose flour (1 3/4 cups)
3 oz cocoa powder (1 cup)
1 1/2 tsp baking soda
1/2 tsp salt
1 cup full-fat buttermilk at room temperature
1/2 cup full-fat sour cream at room temperature
2 tbsp water can substitute brewed coffee for richer flavor
6 oz butter at room temperature
4.75 oz granulated sugar (2/3 cup)
5 oz brown sugar (2/3 cup)
2 large eggs at room temperature
1 tbsp vanilla extract
For the Caramel-Peanut Filling:
14 oz soft caramels
1/3 cup heavy cream
1 tbsp butter
1/2 cup salted peanuts coarsely chopped
For the Peanut-Marshmallow Frosting:
8 oz butter at room temperature
12 oz creamy peanut butter (1 1/4 cups)
1 tsp vanilla extract
1/4 cup cream
1 lb powdered sugar (4 cups)
7 oz marshmallow cream (1 jar)
To Finish:
1/2 cup chocolate fudge sauce
1/4 cup salted peanuts chopped
7 fun-size Snickers bars cut in half or coarsely chopped
Instructions
To Make the Cupcakes:
Preheat the oven to 350 F. Line 20 cupcake cavities with paper liners.
In a bowl, sift together the flour, cocoa powder, baking soda, and salt. In a separate bowl or large mixing cup, whisk together the buttermilk, sour cream, and water (or coffee).
In the bowl of a large stand mixer fitted with a paddle attachment, beat together the butter and sugars until they’re light and fluffy, about 3-5 minutes. Add the eggs one at a time, beating well after each addition, then add the vanilla extract.
With the mixer running on low speed, add a quarter of the dry ingredients. When it’s mostly mixed in, add a third of the liquid ingredients. Continue to alternate adding drys and liquids, ending with the dry ingredients. When the drys are almost all mixed in and only a few streaks of flour remain, stop the mixer and finish mixing by hand with a spatula. Scrape down the bottom and sides of the bowl.
Scoop the batter into the lined cupcake pans. Bake in the preheated oven for 22-25 minutes, until the tops of the cupcakes spring back when lightly pressed. Cool completely.
To Make the Filling:
Don’t make the filling until you’re ready to fill the cupcakes. Combine the caramels, cream, and butter in a microwave-safe bowl. Microwave in 30-second increments, stirring well after every 30 seconds. They may resist melting and coming together at first, but continue to stir and heat until you have a smooth, fluid mixture. Add the chopped peanuts and stir them in.
To Make the Frosting:
Combine the butter and peanut butter in the bowl of a large stand mixer fitted with a whisk attachment, and beat on medium-high speed until light and fluffy. Add the vanilla, cream, and powdered sugar, and mix on low speed until the sugar is moistened. Raise the speed to medium, and continue to beat until the mixture lightens and becomes fluffy and smooth. Add the marshmallow cream and stir it in by hand using a rubber spatula, scraping the bottom and sides of the bowl well. Once the frosting is well-mixed, spoon it into a pastry bag fitted with a large star tip.
Assembly:
Use a sharp paring knife to cut a cone-shaped hole out of the top of the cupcakes. Scoop the caramel-peanut filling into the hole, coming almost all the way to the top. Cut the bottom off of the cupcake cone, and replace the top of the cupcake on top of the caramel. (The cupcake filling can be eaten or thrown away—I trust you will find something to do with it.) If the caramel starts to get a little hard to work with, microwave it briefly until it is fluid again.
Once all of the cupcakes are filled, pipe the frosting on top in one big decorative swirl. Add a drizzle of fudge sauce or chocolate ganache, a sprinkling of chopped peanuts, and half of a fun-sized Snickers bar on top. Store Snickers Cupcakes in an airtight container at room temperature, and enjoy within 3-4 days.
thanks done share recipes to : https://foodandcake456.blogspot.co.id/2017/04/snickers-cupcakes.html
Ingredients For the cupcakes 4 ounces bittersweet chocolate, finely chopped 1/3 cup (1 ounce) Dutch-process cocoa 1 teaspoon instant espress...
Ingredients
- For the cupcakes
- 4 ounces bittersweet chocolate, finely chopped
- 1/3 cup (1 ounce) Dutch-process cocoa
- 1 teaspoon instant espresso powder
- 1/2 cup boiling water
- 3/4 cup plus 2 tablespoons (4 ounces) all-purpose flour
- 1/2 cup granulated sugar
- 1/4 cup packed light brown sugar
- 1/2 teaspoon salt
- 1/2 teaspoon baking soda
- 1/2 cup sour cream, at room temperature (or plain full fat Greek yogurt)
- 1/4 cup vegetable oil
- 2 large eggs plus one egg yolk, at room temperature
- 2 teaspoons white vinegar
- 1 teaspoon vanilla extract
- For the frosting
- 1/3 cup granulated sugar
- 2 large egg whites
- Pinch salt
- 12 tablespoons (6 ounces) unsalted butter, cut into 12 pieces and at room temperature
- 6 ounces semisweet chocolate, melted and cooled slightly
- 1/2 teaspoon vanilla extract
Directions
Make the cupcakes:
In a medium heatproof bowl add the chocolate, cocoa powder, and espresso powder. Pour hot water over mixture. Cover and let stand for 5 minutes. Whisk mixture gently until smooth then set aside to cool.
Meanwhile, preheat the oven to 350°F. Line a standard 12-cup muffin tin with foil or paper liners.
In a small bowl, whisk together the flour, sugar, salt, and baking soda.
Whisk sour cream, oil, eggs, egg yolk, vinegar, and vanilla into the cooled chocolate mixture until smooth. Stir in the flour mixture until smooth, being careful not to overmix.
Using a spring-loaded scoop, divide the batter evenly among prepared muffin cups. Bake until cupcakes are set and firm to the touch, about 20 minutes. Let cupcakes cool in pan on a wire rack for 10 minutes before removing from pan to cool completely, about 1 hour. Cupcakes can be stored in an airtight container at room temperature for up to 1 day.
Make the frosting:
Combine the sugar, egg whites, and salt in the bowl of a stand mixer. Set bowl over a saucepan filled with 1-inch of gently simmering water. Whisking gently and constantly, heat mixture until sugar is dissolved and mixture is slightly thickened and foamy and registers 150°F on a candy thermometer or a digital thermometer, about 3 minutes.
Fit stand mixer with whisk attachment and beat the egg white mixture on medium speed until slightly cooled and thickened, about 2 minutes. Add the butter, 1 piece at a time, until smooth and creamy. If the mixture looks curdled, that’s okay. Just keep beating until it becomes smooth.
Add chocolate and vanilla and mix until combined. Increase speed to medium-high and beat until light, fluffy, and well combined, about 30 seconds, scraping down the sides of the bowl as necessary.
Frosting can be made 1 day ahead of time and stored in an airtight container in the refrigerator. Warm frosting in the microwave for 5 to 10 seconds and stir until creamy again before frosting cupcakes.
Frosting can also be transferred to a ziptop bag and frozen for up to 1 month. Defrost in the fridge overnight then rewhip in the stand mixer until light and smooth.
thanks done share recipes to : https://www.handletheheat.com/the-best-chocolate-cupcakes/#simplerecipe
This is the be all, end all, of chocolate cupcake recipes. Your days of resorting to a cake mix can be a thing of the past. If you love ma...
This is the be all, end all, of chocolate cupcake recipes. Your days of resorting to a cake mix can be a thing of the past. If you love making desserts from scratch and have been searching for the perfect chocolate cupcake recipe, your search is over.
I know these are big claims, but honestly, I feel like I have tried every chocolate cupcake recipe on the planet. And while there are many good chocolate cupcake recipes out there, this one is hands down the best chocolate cupcake recipe ever. I’m pretty confident you will agree.
These cupcakes are the perfect thing to pair with the homemade rainbow chip frosting recipe I posted about the other day. And I have a salted caramel frosting recipe coming your way soon as well that is amazing with these cupcakes.
IMPORTANT NOTES ABOUT MAKING SUPER MOIST CHOCOLATE CUPCAKES FROM SCRATCH
The recipe calls for hot water, which is super important to achieving super moist chocolate cupcakes with an intense chocolate flavor. It doesn’t have to be boiling, but it needs to be really hot because the heat is going to react with the cocoa powder, causing it to “bloom”, which brings out as much chocolate flavor as possible from the cocoa powder.
The hot water is also going to create a pretty thin batter, too. Don’t be alarmed by that! The thin batter is going to allow the baking powder and baking soda in the batter to really do their magic and the cupcakes will rise and dome beautifully, with a wonderful texture thanks to all the scientific magic going on behind the scenes.
Ingredients
- 1 cup all-purpose flour
- 1 cup granulated sugar
- 1/2 cup cocoa powder
- 1 teaspoon baking powder
- 1/2 teaspoon baking soda
- 1/2 teaspoon salt
- 1 large egg, room temperature
- 1/2 cup buttermilk, room temperature
- 1/2 cup vegetable oil
- 1 teaspoon vanilla
- 1/2 cup very hot water
Instructions
Heat oven to 350 degrees. Line a cupcake pan with paper liners.
Combine the flour, sugar, cocoa powder, baking powder, baking soda, and salt together in a bowl and whisk together.
Combine the egg, buttermilk, oil, and vanilla in another bowl and whisk together.
Add the wet ingredients to the dry ingredients and mix using a stand mixer until combined.
Add the hot water to the batter and mix again, scraping the sides of the bowl as necessary, until combined. Batter will be thin.
Fill cupcake liners half full, then bake for 18-21 minutes, until a toothpick comes out with only a few moist crumbs when used to test a cupcake.
Cool completely before frosting.
thanks done share recipes to : https://houseofnasheats.com/moist-chocolate-cupcakes-recipe/
Now, this is not my usual chocolate cupcake recipe. These cupcakes are meant to be a bit sturdier than your typical cupcake so that they can...
Now, this is not my usual chocolate cupcake recipe. These cupcakes are meant to be a bit sturdier than your typical cupcake so that they can hold up to the cheater cheesecake filling and that delicious cream cheese frosting.
Another way – perhaps a more authentic way – to make black bottom cupcakes would be to bake the cupcakes, core them, and then fill with a real cheesecake batter and re-bake to fully cook the cheesecake. However, to me that just spells burnt cupcakes – no, thanks. I’d rather have a silky chocolate cake with a fine crumb that gives way to a sweet and tart vanilla cheesecake filling and is generously topped with cream cheese frosting and chocolate fudge drizzle.
Ingredients
- 1 3/4 cups flour
- 2 cups sugar
- 1 cup cocoa
- 1 1/2 teaspoon baking soda
- 1 1/2 teaspoon baking powder
- 1 teaspoon salt
- 2 eggs
- 1 cup whole milk
- 1/2 cup oil
- 1 cup boiling water
- Cheater Cheesecake Filling Ingredients:
- 1 cup plus 4 Tablespoons heavy whipping cream (35%)
- 1-8oz package cream cheese
- 1 cup powdered sugar
- 1 teaspoon vanilla extract
- Cream Cheese Frosting Ingredients:
- 1 cup unsalted butter
- 1 cup softened cream cheese
- 3 cups powder sugar
- 4 Tablespoons heavy whipping cream (35%)
Instructions
- Preheat oven to 350F and line a muffin tray with your chosen liners.
- Mix the flour, sugar, cocoa, baking soda, baking powder, and salt in a bowl. Set aside.
- In a separate bowl add the eggs, milk, and oil.
- Mix the wet ingredients into the dry ingredients and stir until fully incorporated. Beat for 3 minutes on medium speed before slowly adding in the boiling water starting with a small amount then pour in the remaining boiling water.
- Scoop batter into cupcake liners until filled 3/4 of the way. Bake for 25 minutes and allow to cool completely before coring and frosting.
- Cheater Cheesecake Filling Directions
- Beat the whipping cream in a large bowl for 4 minutes until thickened and soft peaks form. Set aside 1/4 cup for the frosting.
- In a separate bowl, beat the cream cheese, sugar, and vanilla. Gently stir in the whipping cream.
- Core out the center of each cupcake (using a cupcake corer) and use a piping bag to insert cheesecake filling into the cupcake.
- Cream Cheese Frosting Directions
- In a separate bowl, beat the butter, cream cheese and sugar. Once smooth and fully incorporated, fold in the whipped cream mixture. Adjust the consistency by adding more sugar or cream as needed.
- Spoon the frosting into a piping bag with a star tip (I used a 1M) and frost the cupcakes starting in the center and circling out and up.
- Drizzle the chocolate fudge on top of the frosting

thanks done share recipes to : https://sugarspiceandglitter.com/black-bottom-cupcake-recipe/
Chocolate and strawberries – could there be a better combo? There’s just something about fudgy, creamy chocolate and fresh, sweet, juicy ber...
Chocolate and strawberries – could there be a better combo? There’s just something about fudgy, creamy chocolate and fresh, sweet, juicy berries that go so perfectly together. And when Valentine’s day rolls around, these chocolate cupcakes with strawberry frosting are the perfect thing.
I always get really excited for Valentine’s Day. I love the idea of taking a day to appreciate the people we love – and after cold, dreary January, I think everyone can use something to brighten their day.
I don’t typically buy gifts or do anything too fancy for Valentine’s Day – but I love to make a special treat to celebrate. And these chocolate cupcakes with strawberry frosting are great for February 14th, or whenever you’re looking for a chocolate cupcake recipe that’s just a little extra special.
First process the berries in your food processor or blender, and then put the juice through a metal sieve to remove the seeds. I usually do about 1/2 at a time and push the mixture through using the back of a spoon. It can be a little tedious – so if you don’t mind seeds in your frosting, you can skip this step.
Then boil the juice down until it’s thick like jam, and place it in the fridge or freezer to cool. After this is done – making the strawberry frosting is straight forward. Beat the butter until fluffy, then slowly beat in the powdered sugar followed by the cooled, boiled down strawberry puree.
INGREDIENTS:
- CHOCOLATE CUPCAKES
- 1 cup all-purpose flour
- 1/2 cup cocoa powder
- 1 teaspoon baking powder
- 1/2 teaspoon baking soda
- 1/4 teaspoon salt
- 1/2 cup vegetable oil
- 1 cup granulated sugar
- 2 large egs
- 1 tsp vanilla extract
- 1/2 cup buttermilk (or 1 1/2 teaspoons mixed with 1/2 cup milk)
- STRAWBERRY FROSTING
- 12 oz strawberries, fresh or frozen (if using frozen – make sure they aren’t packed in syrup or sugar)
- 1 cup unsalted butter, softened
- 4-5 cups powdered sugar
- 1-2 tablespoons whipping cream or heavy cream
DIRECTIONS:
- CHOCOLATE CUPCAKES
- Preheat the oven to 365F degrees and line muffin trays with muffin papers (you’ll end up with about 14 cupcakes total).
- In a medium bowl whisk together the flour, cocoa powder, baking powder, baking soda and salt.
- In a separate large bowl beat together the oil, sugar, vanilla extract and eggs.
- Turn the mixer to low and carefully beat in about 1/2 of the flour mixture followed by about 1/2 of the buttermilk. Repeat with the rest of the flour mixture and buttermilk.
- Spoon the batter into the prepared muffin pan, filling each about 2/3 full.
- Bake for 15-18 minutes, or until an inserted toothpick comes out clean.
- STRAWBERRY FROSTING
- Core the strawberries, if not already.
- Place the strawberries in a food processor or blender and pulse until they’re pureed. (If using frozen – you may want to warm up the berries in the microwave to make this easier).
- Put the puree through a metal sieve to remove the seeds. I press it through using the back of a spoon.
- Place the puree in a medium sauce pan and bring to a gently boil while stirring occasionally to avoid burning. Boil until the mixture is thick like jam and reduced to about 1/4 to 1/3 cup. (About 10-20 minutes).
- Place in the fridge or freezer to cool completely.
- In a large bowl beat the butter until fluffy. Carefully beat in 2 cups of powdered sugar.
- Then beat in 3-4 tablespoons of reduced strawberry puree. It must be cold – otherwise the frosting can separate.
- Beat in the rest of the powdered sugar about 1/2 cup at a time until the desired consistency is reached. Add in 1-2 tablespoons cream as needed.
- Frost the cupcakes using a piping bag and tip or a knife.

thanks done share recipes to : https://ohsweetbasil.com/chocolate-cupcakes-strawberry-frosting/
Truth: this just might be *THE* most delicious recipe on Vegan Chickpea to date. I know there are a lot of ways to define delicious and it’s...
Truth: this just might be *THE* most delicious recipe on Vegan Chickpea to date. I know there are a lot of ways to define delicious and it’s basically impossible to compare the deliciousness of a savory dinner entree like my popular Broccoli, Kale & Rice Casserole to this sweet, salted chocolate peanut butter combo; they’re just not even on the same playing field – though both fields are REALLY tasty ones that I want to play on!
The thoughts in my head went something like this when formulating this recipe in my mind…
Peanut Butter… oh, Peanut Butter Pie!
No – Chocolate… Salted Chocolate!
AH – Chocolate AND Peanut Butter!
…Salted Chocolate Peanut Butter Pie!!!
Oh, and I’ll add some protein for good measure. And make them in muffin cups because they’ll look cute, and be easier to cut that way.
Done!
That was essentially it – welcome to the advanced world of recipe creation. 🙂
And THUS… the leaning tower of Salted Chocolate Peanut Butter Pie Protein Cups was born.
A couple weekends ago I made a No Bake Peanut Butter Cup Pie for my friend’s birthday and he absolutely LOVED it, thanking me multiple times and giving me an enormous bear hug after his first bite. (I knew I had the key to his heart with that dessert, as he’s a kindred peanut butter chocolate combo lover.)
I was in the Netherlands at the time and a few Dutch people looked skeptically at the pie, as it’s not a combination they grew up with or really have in their country (I know, it’s hard not to pity them, right?! Haha! Just kidding… sort of!).
Ingredients
- FOR THE CRUST:
- 1 cup almond meal *see notes for substitution
- 1/4 cup raw cacao powder
- 2 Tbsp coconut oil
- 2 Tbsp date syrup
- pinch of salt
- FOR THE FILLING:
- 3/4 cup organic creamy peanut butter
- 1/2 cup water
- 1/2 cup unflavored rice protein or other good quality protein powder **see notes for substitutions
- 1/3 cup date syrup
- 1/3 cup melted coconut oil
- 1/2 tsp sea salt (more to taste)
- FOR THE CHOCOLATE TOPPING:
- 3 oz chocolate / chocolate bar of choice - for sugar free I love Lily's (USA) or So Free (UK/Europe)
- coarse sea salt
Instructions
- For the crust: Combine all ingredients in a bowl and mix well. Divide evenly into 6 portions and press into a silicone muffin pan. IIf you don't have a silicon muffin pan you can use a metal one, but I recommend creating tabs from parchment paper that will help make removing the cups from the muffin tins once frozen much easier. The tabs should be about 4? long and 1/2? wide. Lay them in each slot of the muffin tin before pressing in the crust.
- For the filling: Combine all ingredients and mix well. Pour evenly on top of the 6 crusts. Freeze for at least 2 hours to set.
- For the topping: Melt the chocolate in a double broiler or slowly in a saucepan on low heat, stirring frequently. Distribute evenly on top of the 6 cups. Top with coarse sea salt, to taste. Freeze for at least 30 minutes.
- Keep these refrigerated - they'll last at least 5 days. You can also freeze them and remove them as needed, but allow to thaw at room temperature for AT LEAST 20 minutes first so they're not rock solid!
- Cuisine: vegan, gluten free, paleo, refined sugar free, vegetarian | Recipe Type: dessert, snack, protein

Notes
*I've also tested this with coconut flour and enjoyed the flavor. It gives more of a contrasting flavor and texture than the almond does, but is a little drier. Given that the coconut flour crust will be drier, you need to double the amount of oil to compensate - so 1/4 cup of coconut oil.
**I have not tested this recipe with any protein powders other than Pulsin but I think any powder that you enjoy will work here, as it's not getting baked, so no need to worry about a resulting funky texture (though I do recommend a plain flavor, or vanilla). Whole Foods brand of 365 Everyday Value products also has a plain pea protein powder that would probably work well.
thanks done share recipes to : https://veganchickpea.com/salted-chocolate-peanut-butter-pie-protein-cups/
Often the most beloved element of a cupcake is the frosting. A good frosting can elevate a simple cupcake to a delicious, rich dessert. Cl...
Often the most beloved element of a cupcake is the frosting. A good frosting can elevate a simple cupcake to a delicious, rich dessert. Classic American buttercream is surprisingly easy to make, and can be adjusted to your personal preferences using added flavorings, and adjusting the ratio of the ingredients. American buttercream is simply a combination of butter, powdered sugar, vanilla (or other flavoring), and usually a bit of milk or cream- that’s pretty much it! The frosting I love to use the most often is my Cream Cheese Frosting, which is simply a variation on American Buttercream, with some cream cheese added. Free free to play with this recipe and adjust it to your palate. This is a very sweet, classic frosting that pairs well with most any flavor of cupcake.
1 cup (2 sticks) Challenge butter (salted, or unsalted)
1/4 teaspoon salt (if using unsalted butter)
4 cups powdered sugar
1 teaspoon vanilla extract (best quality available)
2-3 tablespoons heavy cream, half and half or milk.
*Optional- As mentioned above, I like a cream cheese version of this frosting best. The cream cheese adds to the creamy texture, and cuts down on the sweetness just a bit. If desired, for a very light cream cheese flavor add 1/2 block (4 oz). cream cheese, leaving the other ingredients (as listed above) the same. For a more traditional cream cheese flavor, reduce the butter to 1/2 cup, and add 1 block (8 oz.) of cream cheese. If using a full block of cream cheese, you can reduce the cream or milk to 1 tablespoon total.
Flavoring options– An almost unlimited number of flavoring options can be added in addition to, or instead of the vanilla. Orange and/or lemon zest, citrus extracts, mint extract, coconut extract or the seeds of a vanilla bean are all wonderful options. In most cases I’ll still add 1/2 teaspoon of vanilla, then 1/2 teaspoon of the other flavoring. For zest, add about 1 teaspoon fresh zest. For chocolate buttercream, add 1/2 cup (good quality) unsweetened cocoa powder.
Directions-
* In the bowl of an electric mixer, fitted with the whisk attachment, beat butter (on medium speed) until completely smooth (30 seconds to a minute). (If you are adding cream cheese, add it now, then beat until smooth)
* Add salt (if needed).
* One cup at time, add 2 cups of powdered sugar, beating after each addition.
* Add vanilla, or other flavorings and beat to combine.
* Add about 1 tablespoon of cream, and continue beating.
* Add the remaining 2 cups powdered sugar, one at a time.
* Add an additional 1-2 tablespoons cream until desired consistency is reached. If you want to pipe the frosting on cupcakes, the frosting should be nice and thick. Continue to beat another minute or so. The frosting should now be smooth and fluffy.
Troubleshooting-
* If your frosting is not smooth, it is likely because the butter was not fully smooth before adding the other ingredients.
* If your frosting will not hold up when piped on cupcakes, your frosting has too much liquid or is too warm. Put entire bowl of frosting in the fridge for 15-20 minutes and it will stiffen up. If it is still too thin, then add 1/4 to 1/2 cup powdered sugar, beat well.
Recipe Source- American buttercream first appeared in cookbooks in the early 1900’s (here’s a little buttercream history) Countless sources since then have included very similar versions, always using some combination of butter (or shortening), powdered sugar, milk and flavoring. The recipe above is simply the proportions I like to use.
thanks done share recipes to : www.glorioustreats.com/2011/08/american-buttercream-frosting-recipe.html
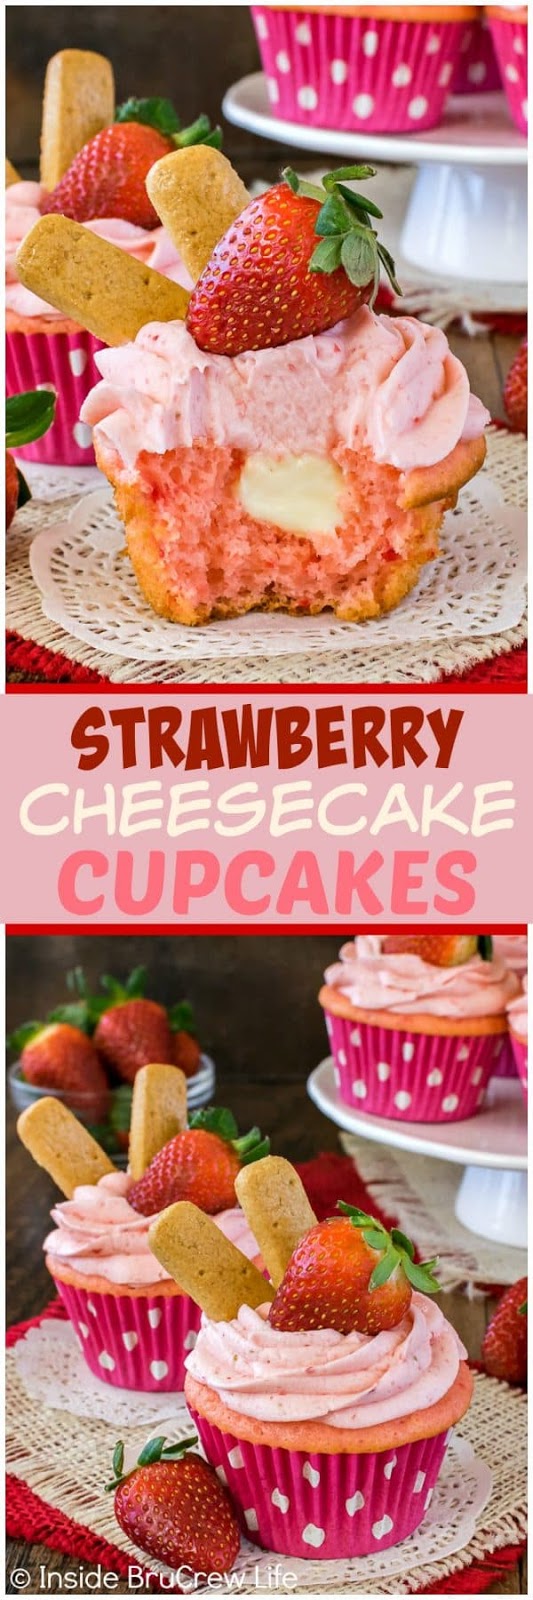
These soft Strawberry Cheesecake Cupcakes have a creamy cheesecake center and fresh homemade strawberry frosting. They are always a hit at ...
These soft Strawberry Cheesecake Cupcakes have a creamy cheesecake center and fresh homemade strawberry frosting. They are always a hit at any dinner or party we bring them to.
{1} We had a great Easter weekend celebrating our Saviour! Loved spending the day with our church family first, and then getting to see cousins and family for the rest of the day. And you would be so proud of me. I actually took lots of pictures…of people not food. This strawberry chocolate cheesecake will just have to happen again so I can get better pictures.
{2} My hubby and I have started watching Lost on Netflix. Unfortunately for me, I know the ending because it was all over Facebook at the time. Still, it is easy to get hooked, and I want to keep watching more episodes into the wee hours of the night.
{3} Our crazy dog decided to help herself to over a pound of chocolate from the kids Easter basket’s. I told them to keep it up on a counter or cupboard, but they do not listen. Of course, I know what a thief the beast is. She was acting a little hyper and crazy last night, so we googled and called a 24 hr. vet line to see if there was anything we could do.
{4} I am giving up sugar for a week or two. This is very hard for my sweet tooth to handle. So far so good, but it has only been one day. LOL! I want to see if it makes a difference in my weight. Sadly that means I can’t bake for that time either because I always find myself taste testing when I am baking. That kinda breaks the no sugar rule.
Now I know some of you are cheering because you think that means no pics to tempt you and make you drool. Well, that’s just not true because I have plenty of ones that I haven’t even shared yet. So, even though I might not be eating these this week, I am still going to share with you.
Ingredients
- For the Cupcakes
- 1 strawberry cake mix
- 1 - 3.4 ounce instant strawberry pudding mix
- 1/2 cup oil
- 4 eggs
- 1 cup milk
- For the Cheesecake Filling
- 1 - 3.4 ounce package instant cheesecake pudding mix
- 1/2 cup milk
- 4 ounces cream cheese, softened
- 1 1/4 cups Cool Whip, thawed
- For the Strawberry Butter Cream
- 1/2 cup shortening
- 1/2 cup butter, room temperature
- 1/4 teaspoon salt
- 1/2 teaspoon vanilla extract
- 1/2 teaspoon strawberry extract
- 1 Tablespoon water
- 3/4 cup diced strawberries
- 5 cups powdered sugar
- 24 whole strawberries
- 48 graham cracker cookie sticks
Instructions
- Preheat the oven to 325 degrees. Line muffin tins with 24 cupcake liners.
- Beat the cake mix, pudding mix, oil, milk, and eggs for 2 minutes. Spoon batter into the prepared muffin tins. Bake for 18-20 minutes, or until the tops spring back. Cool on a wire rack.
- In a small bowl, whisk the milk and pudding mix until creamy and thick. Beat the cream cheese until creamy. Add the pudding and beat again. Fold in the whipped topping.
- Use a cupcake corer or small knife to cut out the center of the cupcakes. Spoon the cheesecake filling into a piping bag with icing tip 12 and fill the centers. Refrigerate while you make the frosting.
- Beat the shortening and butter until creamy. Add the salt, vanilla, and strawberry extract and beat again. Slowly add half the powdered sugar until it is mixed in.
- Place the water and strawberries in a food processor or blender and puree. Pour into the frosting and beat until creamy. Add the rest of the powdered sugar and beat until light and fluffy. Use a large piping bag and icing tip 1M to swirl the frosting on the chilled cupcakes. Add the cookie sticks and a fresh berry to the top of each cupcake. Refrigerate cupcakes until time to serve. Makes 24 cupcakes.

thanks done share recipes to : https://insidebrucrewlife.com/2011/04/strawberry-cheesecake-cupcakes/
These chocolate covered strawberry cupcakes are a valentine favorite at our house. The strawberry buttercream is insanely delicious and loa...
These chocolate covered strawberry cupcakes are a valentine favorite at our house. The strawberry buttercream is insanely delicious and loaded with real strawberry flavor. Because the cupcakes are made from a mix and the tops are dipped in dark chocolate candy melts they look fancy but are pretty simple to make.
We have Valentine’s Day turned up to 11
Valentine’s Day is special to our family. Our middle daughter has had 14 heart surgeries and the very first one was on Valentine’s Day. The nurses at the time taped a valentine made by local school children to her crib. That small gesture touched our hearts during a very difficult time. Every year since we have been delivering handmade valentines, toys and books to the children spending Valentine’s Day at the children’s hospital. We also bring a balloon for each child and cupcakes for the staff. Our community has supported this effort over the years and last year we collected FOUR VAN LOADS of goodies to deliver to these deserving kids.
Of course my favorite part is dreaming up valentine-themed cupcakes. And this recipe has become my favorite. Chocolate Covered Strawberry Cupcakes! Yum! Moist yellow cake dipped in dark chocolate and frosted with a strawberry buttercream absolutely loaded with real strawberries. The word “luscious” sort of creeps me out, but these actually are totally luscious. This frosting tastes like room-temperature strawberry ice cream. It is so good. I took the cupcakes I made for this post to some girlfriends and they were literally groaning, when-harry-met-sally-style, as they ate them. I’ll have what she’s having!
INGREDIENTS
- 24 yellow cake cupcakes prepared according to package diretions
- 6 ounces Ghirardelli Dark Melting Wafers
- 2 sticks unsalted butter room temperature
- 1 pound powdered sugar
- 1/4 cup milk, half and half or cream
- 1 1/2 teaspoons clear vanilla extract
- 1.2 ounces freeze-dried strawberries ground into a powder
- red or pink food dye optional
- Chocolate-Covered Strawberry Cupcakes
INSTRUCTIONS
- Once cupcakes have cooled, melt the chocolate in the microwave according to the package directions. Once it is melted and smooth, dip each cupcake into the chocolate, turning it as you go to make sure you're getting all the way to the edge of the cupcake paper. While it's still upside-down, remove some of the excess with the tines of a fork. Don't worry if you leave a small mark in the top of the cupcake, the frosting will cover it. Set aside to let the chocolate set, about 10 minutes.
- Meanwhile, put the butter, powdered sugar, cream, and vanilla in the bowl of your stand mixer. Beat on low until ingredients start to come together then turn up to medium-high and beat for 2 minutes. Add 4 tablespoons of the strawberry powder (reserve the rest for another use) and beat for an additional two minutes. Add food dye, if desired and beat until combined. Then turn down to low and let run for about a minute to get rid of air bubbles.
- Using a 1M tip or a ziplock with the corner cut off, pipe wide rosettes onto the top of the cupcake, starting in the middle and working outwards. Allow the frosting to set for 15-20 minutes before moving to your serving tray or storage container.

thanks done share recipes to : www.bakersbrigade.com/recipe/chocolate-covered-strawberry-cupcakes/
These chocolate banana cupcakes are insanely delicious. Moist banana cake dipped in dark chocolate then topped with chocolate almond butter...
These chocolate banana cupcakes are insanely delicious. Moist banana cake dipped in dark chocolate then topped with chocolate almond buttercream and a banana chip. After getting rave reviews for these Chocolate Covered Strawberry Cupcakes, I put my thinking cap on to see if I could come up with a new take on the chocolate-covered cupcake. This was a no-brainer. My family says that these are the best cupcakes I have ever made. They look so appealing and the two kinds of chocolate take it to the next level. It’s like a decadent version of the classic chocolate chip banana bread.
Putting these chocolate banana cupcakes together is easy. Once your cupcakes have cooled, just dip them in your melted dark chocolate. No need to temper if you use the Ghirardelli melts. One important thing to watch for: when you bake up your cupcakes be sure to fill each one with 4 tablespoons (1/4 cup) of batter. You can also use #16 cookie scoop, I’ve got details of how to choose the right size cookie scoop and which brand to buy here. It’s important that the cupcakes form a nice dome above the paper. Otherwise you won’t be able to dip them in the chocolate without making a big mess. I used a 1M tip to pipe the frosting on top but you can also put the frosting in a ziplock and snip the end and pipe that way. Or just spread it on with a butter knife or off-set spatula. These taste so good you will not care if they look imperfect.
INGREDIENTS
- For Cupcakes:
- 3 ripe bananas mashed
- 1 cup sugar
- 2 eggs
- 3/4 cup vegetable oil
- 2 cups all-purpose flour
- 2 teaspoons baking soda
- 1 teaspoon vanilla extract
- 1 tablespoon buttermilk powder or substitute 3 tablespoons buttermilk for buttermilk powder and water
- 2 tablespoons water
- 10 oz. Ghirardelli Dark Chocolate Melting Wafers or other dark chocolate candy melts
- dried banana chips for decoration
- For Buttercream
- 2 sticks unsalted butter softened
- 1 pound confectioner's sugar
- 1/2 cup cocoa powder I like Nestle
- 1 teaspoon vanilla extract
- 1 teaspoon almond extract
- 1/2 teaspoon salt
- 1/4` cup milk, half and half or cream
- chocolate banana cupcakes
INSTRUCTIONS
- For Cupcakes:
- Preheat oven to 300 degrees F.
- In a medium bowl combine flour, baking soda and buttermilk powder.
- In a medium bowl, beat banana and sugar until smooth. Add eggs and beat until combined. Beat in vegetable oil, vanilla and water.
- Pour wet ingredients into dry. Stir until just combined. Pour a scant 1/4 cup of batter into 16 muffin papers in a cupcake pan.
- Bake until a toothpick in the center comes out clean, about 25 minutes.
- For Chocolate-Almond Buttercream
- Meanwhile, put the butter, cocoa, powdered sugar, salt, cream, and extracts in the bowl of your stand mixer. Beat on low until ingredients start to come together then turn up to medium-high and beat for 2-3 minutes. Then turn down to low and let run for about a minute to get rid of air bubbles.
- To Assemble Cupcakes:
- Once cupcakes have cooled, melt the chocolate in the microwave according to the package directions. Once it is melted and smooth, dip each cupcake into the chocolate, turning it as you go to make sure you're getting all the way to the edge of the cupcake paper. While it's still upside-down, remove some of the excess with the tines of a fork. Don't worry if you leave a small mark in the top of the cupcake, the frosting will cover it. Set aside to let the chocolate set, about 10 minutes.
- Using a 1M tip or a ziplock with the corner cut off, pipe wide rosettes onto the top of the cupcake, starting in the middle and working outwards. Top each cupcake with a dried banana chip. Allow the frosting to set for 15-20 minutes before moving to your serving tray or storage container.

thanks done share recipes to : www.bakersbrigade.com/recipe/chocolate-covered-banana-cupcakes/
If you have little kids, then you must know that the few days after a kid’s birthday party can be pretty difficult. Of course, since it is i...
If you have little kids, then you must know that the few days after a kid’s birthday party can be pretty difficult. Of course, since it is impossible that all the invited people can come on the day you planned, you can do nothing else but prepare for a few more visits of your dear friends. And if you are, besides all that, a food blogger, then you can’t risk your good baking reputation and not greet the guests with a sweet bite 🙂
Well if you have recognized what I’m talking about, then I will give my “wild card” for this kind of situation to you – cupcakes. Yes, in a very short time, and without much sweat, you will have a beautiful dessert on your table. A dessert which is very difficult to turn down. And if there are children, success is guaranteed. Simply, I haven’t seen a child that doesn’t lick all the frosting from the cake!
Even though I have made cupcakes numerous times, for this year’s after birthday party, I didn’t want to repeat any of the old recipes, so I decided for something completely different – Hershey S’mores Cupcakes. Don’t know what this is about? Then just imagine: Hershey’s chocolate cupcake with a graham cracker crust, filled with light and fluffy marshmallow filling and topped with milk chocolate ganache. Sounds good? Trust me, as good as it sounds, the taste is even better! Maybe this is not the original S’more dessert, but the beautiful Hershey’s chocolate cake made this treat only more decadent
As for he kids, the first disappointment because of the missing frosting was quickly substituted by excitement when, while drilling trough the ganache with their spoons, they concluded that there is a hidden marshmallow filling. Of course, that means that you will automatically have to take into account a few destroyed Hershey S’mores Cupcakes which will just serve for play time for the little chocolate diggers:)
Ingredients
- For the crust:
- 1 1/3 cup graham crackers crumbs
- 5 Tablespoon sugar
- 5 Tablespoon unsalted butter-melted
- For chocolate cupcakes:
- 1 cup sugar
- 3/4 cup plus 2 tablespoons all-purpose flour
- 6 tablespoons Hershey’s Cocoa powder
- 3/4 teaspoon baking powder
- 3/4 teaspoon baking soda
- 1/2 teaspoon salt
- 1/2 cup milk- room temperature
- 1/2 cup vegetable oil
- 1 large egg-lightly beaten
- 1 teaspoon vanilla
- 1/2 cup boiling water
- For marshmallow filling:
- 2 egg whites
- 1/2 cup sugar
- 1/4 teaspoon cream of tarter
- 1 teaspoon vanilla
- For milk chocolate ganache:
- 1 cup heavy whipping cream
- 10 oz. milk chocolate-finely chopped
- 1/2 Tablespoon vegetable oil
Instructions
- To make the crust:
- Place rack in center of the oven and preheat the oven to 325 F, line cupcake tins with 16 cupcake liners and set aside.
- In a small bowl, combine graham cracker crumbs, sugar and melted butter and mix well with a fork.
- Press about 1 1/2 Tablespoon of the mixture into the bottom of each cupcake liners and bake 6 minutes, then set aside to cool.
- To make the cupcakes:
- In a large bowl combine cocoa, sugar, flour, baking powder, baking soda, and salt.
- Add oil, milk, egg, and vanilla. Beat for 2 minutes with a hand-held electric mixer on medium speed, then add boiling water and beat to combine (batter will be thin). Divide batter evenly between cupcake liners over the crust (it should be 3/4 full)
- Bake until a toothpick inserted into the center comes out clean, about 20-25 minutes. Set aside to cool in pan, then using a sharp knife or cupcake corer hollow out the centers of each cupcake(cut the top of each center and save for later to place it back onto the fillin).
- To make marshmallow filling:
- In a heatproof bowl over a pot of simmering water whisk together egg whites, sugar and cream of tartar, until sugar dissolves (be careful, the water shouldn’t touch the bottom of the bowl). Continue whisking over simmering water until egg mixture is warm to touch, then remove from heat and continue beating with the mixer until still peaks form. At the end add vanilla and mix well.
- Transfer the filling to a piping bag with round tip or use plastic bag and cut off the corner and fill the cupcakes. Place back the tops from centers of cupcakes.
- To make the ganache:
- On a low heat in a small sauce pan melt chopped milk chocolate with 1/2 Tablespoon vegetable oil, stirring until it’s completely smooth. Remove from heat and add cold heavy whipping cream, stir well until it’s evenly combine. Using a spoon spread the ganache onto the cupcakes. If the ganache is to runny place it in the fridge briefly to set before top the cupcakes.
- Store in the fridge.

thanks done share recipes to : https://omgchocolatedesserts.com/hershey-smores-cupcakes/
Mr. Gracious talks endlessly about his love for Boston Cream doughnuts. I mean, seriously, the man loves his doughnuts. I was curious to se...
Mr. Gracious talks endlessly about his love for Boston Cream doughnuts. I mean, seriously, the man loves his doughnuts. I was curious to see if he’d feel the same way about Boston Cream Pie, and being more of a cupcake person, I made some Boston Cream Pie Cupcakes.
Let me tell you, these were a huge hit, not just with Mr. Gracious, but with the whole family! These will definitely become a regular in our dessert rotation. I will admit that these Boston Cream Pie Cupcakes are a little time consuming to make, but they are so worth it.
My Boston Cream Pie Cupcakes are a combination of delightful sponge cake, filled with creamy pastry filling, and topped with a wonderful (and easy) chocolate ganache. The ganache recipe is the same one I use for my Raspberry Ganache Thumbprints, except without using the raspberry preserves.
Ingredients
- For the Cake
- 12 tablespoons unsalted butter softened
- 1 cup sugar
- 2 teaspoons vanilla
- 3 eggs
- 1 1/2 cups flour
- 2 teaspoons baking powder
- 1/2 teaspoon salt
- 2/3 cup buttermilk
- For the filling
- 3 egg yolks
- 3 cups milk
- 1/2 cup sugar
- 1/3 cup cornstarch
- 1/4 teaspoon salt
- 1 teaspoon vanilla
- For the Ganache
- Use the Ganache recipe here omitting the raspberry preserves.
Instructions
- For the cake:
- In a large mixing bowl cream together the butter and sugar.
- Add vanilla and beat again.
- Add eggs, one at a time, beating well after each addition.
- Mix together flour, baking powder and salt in a separate bowl.
- Alternate adding flour mixture and buttermilk to the creamed mixture in 3 batches, beginning and ending with the dry ingredients. Beat after each addition, just until combined.
- Line a lightly greased muffin pan with cupcake liners and fill each liner 3/4 of the way full.
- Bake in a 350° oven for 18-25 minutes, or until a toothpick comes out clean.
- Allow to cool completely
- For the Filling:
- In a medium bowl, beat egg yolks well.
- Gradually stir in milk until well blended.
- In a large, heavy saucepan over medium-low heat, mix together sugar, cornstarch, and salt.
- Gradually add in milk mixture, stirring well to prevent lumps.
- Continue cooking over medium-low heat, stirring constantly until mixture reaches a low boil (about 20 minutes).
- Allow to boil, still stirring for 1 MINUTE. Then immediately remove from heat.
- Set pot in a large bowl of ice water, still stirring.
- When mixture has cooled a bit, stir in vanilla.
- Place a piece of plastic wrap directly on filling to prevent a skin from forming and place in refrigerator until ready to use.
- To assemble the cupcakes:
- When the cupcakes are cooled completely, transfer pastry cream filling to a piping bag with filling tip attached.
- Fill each cupcake with pastry cream and set aside.
- Prepare the Ganache frosting using this recipe and omitting the raspberry preserves.
- Dip each cupcake into the finished Ganache.
- Allow 30 minutes to an hour for the ganache to set.

thanks done share recipes to : https://www.thegraciouswife.com/boston-cream-pie-cupcakes/?m
Here is a very happy post! One that I hope will inspire you to make these gorgeous Happy Birthday Cupcakes. They look like a celebration at ...
Here is a very happy post! One that I hope will inspire you to make these gorgeous Happy Birthday Cupcakes. They look like a celebration at just one glance! They also can be made for anyone, young or old would love you for them. Vanilla cupcakes are my daughter’s favorite. Amber was the one to make these gorgeous cupcakes for my birthday and to share with you all here!
I just adore the color of icing she selected. It is a gorgeous blue and I know you all want to dive right into them. The cupcakes themselves are moist and delicious with a little added sour cream.
The buttercream frosting is perfection. If you want to mound it up high like you see here, you can double the recipe easily. Otherwise there is enough icing for a generous but more conservative amount for each.
Not only do I love sprinkles on the outside but all the way through!! We used jimmies for the interior, they are the longer sprinkles you see around. Your local craft store should be able to provide you with a great selection but there are also more online.
INGREDIENTS
- ¾ cup butter, softened
- 1½ cups sugar
- 3 eggs
- 1 Tbsp. vanilla
- 1 cup sour cream
- ½ cup milk
- 2½ cup flour
- 2 tsp. baking powder
- ½ tsp. baking soda
- ½ tsp. salt
- ¼ cup jimmies (sprinkles)
- Buttercream Frosting
- 1 cup butter, softened
- 3 cups icing sugar or confectioner's sugar (powdered sugar)
- 4 Tbsp. half and half cream
- Blue Food Colouring
- Round sprinkles or jimmies for the top
INSTRUCTIONS
- Preheat oven to 350F. Line 18-24 muffin pans with cupcake liners. Cream butter and sugar together until fluffly. Add the eggs one at a time and then beat in vanilla, sour cream and milk. Mix well. In another bowl whisk the flour, baking powder, soda and salt together. Slowly add the flour into the butter mixture and mix until just incorporated. Fold in the sprinkes. Spoon into cupcake liners ⅔ to ¾ full. Bake for 18-20 min. until they bounce back to a light touch and are lightly golden. Let cool on wire racks completely.
- For the icing, cream the butter in a large bowl. Carefully incorporate the icing sugar and the cream and continue to beat until light and fluffy. Add more cream if necessary. Color to the desired blue colour and mix well. Place icing in a piping bag with a tip and decorate as desired. I usually use a star tip 21. You don’t have to be fancy. Sprinkle with additional jimmies or sprinkles. Place cupcakes in a covered container until you are ready to eat. Refrigerate, remove from fridge 30 min. before serving. Enjoy!!

Tip: To mound the icing up high like you see, you will want to double the icing. Otherwise they will have a more conservative amount for each.
thanks done share recipes to : https://noshingwiththenolands.com/happy-birthday-cupcakes/?utm_content=buffer9c3e0&utm_medium=social&utm_source=pinterest.com&utm_campaign=buffer
What is about cake batter that makes it taste so good? We decided to take that delicious flavor and turn it into the best Cake Batter Butte...
What is about cake batter that makes it taste so good? We decided to take that delicious flavor and turn it into the best Cake Batter Buttercream Frosting. If you like cake batter you will LOVE this recipe.
We used a yellow cake mix to flavor our Cake Batter Buttercream Frosting but you could use any cake mix type.
I use my food scale to measure 1 pound of Powdered Sugar. (If you don’t have a food scale the equivalent would be 4 cups.) You can sift the powdered sugar if it is really lumpy. I do not always do this. Instead I will mix the powdered sugar on low for 30 seconds to break up any large lumps.
Start your mixer (or electric beater) on the lowest setting. I usually put a clean dishtowel around my mixer to keep the sugar from flying out. Keep on low until the butter and sugar are incorporated and then kick your mixer up to medium high.
How much frosting will you need? That always depends on how thick or thin you apply the frosting or how much decorating you do but here are a couple of guidelines. Our recipe should make enough Cake Batter Frosting to cover a 9″ x 13″ sheet cake or a two-layer 8″ cake. If you are making cupcakes, you should be able to frost 24 cupcakes if you apply the frosting with a knife. If you swirl on the frosting with a pastry bag you should be able to frost 15-18 cupcakes depending on the size of the swirl.
INGREDIENTS:
- 1 pound (4 cups) of Powdered Sugar
- 1 cup Butter (We use Salted Sweet Cream Butter)
- 1 cup Cake Mix 1 tsp Vanilla
- Up to 1/4 cup of Milk (add as needed)
- Heaping 1/4 cup of Jimmies Sprinkles
- Decorating Bags
- Wilton 2D Decorating Tip
- Food Scale
- Mixer
DIRECTIONS:
- Combine powdered sugar and cake mix
- Add butter and mix.
- Add vanilla and mix.
- Check consistency. Add 1 tablespoon of milk at a time until you get the desired consistency.
- Add sprinkles last.
thanks done share recipes to : www.twosisterscrafting.com/cake-batter-buttercream-frosting/
Our latest flavor of Buttercream frosting is a gigantic hit … it definitely deserves the title The Best Peppermint Buttercream Frosting. We...
Our latest flavor of Buttercream frosting is a gigantic hit … it definitely deserves the title The Best Peppermint Buttercream Frosting. We think it tastes just like a butter mint candy – sweet, creamy, buttery with just the right amount of peppermint flavoring. This one is a keeper!
I use my food scale to measure 1 pound of Powdered Sugar. (If you don’t have a food scale the equivalent would be 4 cups.) You can sift the powdered sugar if it is really lumpy. I do not always do this. Instead I will mix the powdered sugar on low for 30 seconds to break up any large lumps.
Add 1 cup (2 sticks) of softened butter. I only ever use real butter, but you can use whatever you have on hand. Although I think margarine changes the taste, your buttercream frosting made with margarine will still be better than canned frosting.
INGREDIENTS:
- 1 pound (4 cups) of Powdered Sugar
- 1 cup Butter (We use Salted Sweet Cream Butter)
- 1 Tablespoon Milk
- 1 1/4 teaspoon of Peppermint Extract
- Wilton Color Right Food Coloring – Red
- Decorating Bags
- Wilton 2D Decorating Tip
- Mixer
DIRECTIONS:
- Add powdered sugar to mixing bowl.
- Add softened sticks of butter
- Add 1 tbsp of milk.
- Beat on low until powdered sugar is incorporated. Then move mixer up to medium-high speed. Scrape sides and bottom of bowl often. When completely mixed the frosting may appear dry.
- Add more milk, a little bit at a time until frosting is the proper consistency.
- Add Peppermint Extract
thanks done share recipes to : www.twosisterscrafting.com/the-best-peppermint-buttercream-frosting/
My middle child has apparently inherited my love for any dessert by the name of lemon. So when I told him that I was thinking about making l...
My middle child has apparently inherited my love for any dessert by the name of lemon. So when I told him that I was thinking about making lemon cupcakes, he was way excited. And so was I…because, hellooo? LEMON CUPCAKES.
But these aren’t your ordinary lemon cupcakes. No sirree, Bob…these are The BEST Lemon Cupcakes. Really. And despite a few separate steps, they’re easy to make, too!
I started with my straightforward One-Bowl Fluffy Vanilla Cupcakes recipe, infusing it with a bit of freshly-squeezed lemon juice and lemon zest to create a foundation of all-natural lemon flavor. All you need to know is to start with room temperature ingredients and mix everything in the same bowl…it seriously is a piece of cake! Er, cupcake.
Next I borrowed a trick from my all-time favorite lemon layer cake (thanks, Martha) by making an effortless lemon simple syrup. It was as easy as boiling sugar with water and then stirring in lemon juice. As an added bonus, thin slices of lemon simmer in the syrup as it cooks, resulting in glossy, candied lemon garnishes for the top of the finished cupcakes. But that comes later, so let’s not get ahead of ourselves quite yet…
Ingredients
- FOR THE CUPCAKES:
- 2 1/2 cups all-purpose flour
- 1/2 cup cornstarch
- 2 cups sugar
- 1 tablespoon baking powder
- 1 teaspoon salt
- 1 cup (2 sticks) unsalted butter, at room temperature
- 1 cup sour cream
- 2 tablespoons milk
- 2 tablespoons freshly-squeezed lemon juice
- 4 eggs
- 1 1/2 teaspoons pure vanilla extract
- 1 tablespoon lemon zest
- FOR THE SIMPLE SYRUP:
- 1/2 cup water
- 1/2 cup sugar
- 2 small lemons, thinly sliced
- 1/4 cup freshly-squeezed lemon juice
- FOR THE FROSTING:
- 1/2 cup (1 stick) salted butter, softened
- 8 ounces cream cheese, softened
- 3 1/2 to 4 cups powdered sugar (equivalent to about one 16-ounce box)
- 2 tablespoons freshly-squeezed lemon juice
- 2 teaspoons lemon zest
- 1 teaspoon pure vanilla extract
Instructions
- To prepare the cupcakes, adjust rack to center position of oven and preheat oven to 350°F. Line muffin pans with 24 cupcake liners (*see Tips & Tricks below).
- Set a large sifter or fine mesh sieve over the large bowl of an electric mixer. Measure flour, cornstarch, sugar, baking powder, and salt into sieve and firmly hit the palm of your hand against its side to sift all of the dry ingredients together into the bowl. (If desired, repeat this process a few more times for fluffier cupcakes.)
- To the sifted dry ingredients, add the softened butter, sour cream, milk, lemon juice, eggs, vanilla, and lemon zest. Beat at medium speed for about 30 seconds or until smooth. Scrape down the sides of the bowl with a rubber spatula and beat for 15 more seconds.
- Evenly divide the batter between the 24 cupcake liners (I find it easiest to do this using a cookie scoop). Bake for 18 to 22 minutes or until cupcakes are light golden and test done with a toothpick inserted in center (mine were perfect at exactly 20 minutes). Cool the cupcakes for a few minutes in the pans before transferring them to a wire rack set on top of wax paper or foil (to keep the counter clean for the next step).
- While the cupcakes are baking, prepare the Lemon Simple Syrup by combining the water and sugar in a small saucepan. Bring to a boil over medium-high heat, stirring occasionally until the sugar is completely dissolved. Once the mixture is boiling, add the lemon slices and reduce to a simmer. Simmer for 25 minutes, stirring occasionally. Use a slotted spoon to remove the lemon slices to a sheet of wax paper; allow to cool. Stir the 1/4 cup lemon juice into the simple syrup and set aside.
- Once the cupcakes are done and have been transferred to the wire rack, use a toothpick to poke a bunch of holes all over the top of each cupcake. Use a pastry brush to slowly brush the top of each cupcake with lemon simple syrup, allowing it to soak down into each cupcake. Brush each cupcake once, and then repeat the process (brushing each cupcake again) until all of the simple syrup has been used up. Allow the cupcakes to cool completely.
- One the cupcakes are cool, prepare the frosting. Using an electric mixer, beat together the butter and the cream cheese. Slowly blend in the powdered sugar, lemon juice, lemon zest, and vanilla, then beat until smooth and well-combined. The longer you whip this frosting, the lighter and fluffier it will become. Frost the cupcakes using your desired method (*see Tips & Tricks below...depending on how you decide to frost your cupcakes, you may need to double the frosting recipe).
- Top each cupcake with a piece of candied lemon and white or sparkling sugar sprinkles, if desired. Refrigerate cupcakes until ready to serve, allowing them to come to room temperature a bit before serving.

Notes
I recommend baking these cupcakes in foil cupcake liners, as the lemon syrup will soak through ordinary paper liners. If you don't like the look of plain foil liners, you can also find decorative-looking "grease-proof" paper baking cups that are lined on the inside with foil.
Cornstarch makes the cupcakes fluffy and is added to the regular, all-purpose flour in lieu of using cake flour.
When baking, I like to make sure that all of my ingredients are at room temperature. I speed things up when necessary by cutting my butter into small pieces and spreading them out on a plate or cutting board (which softens the butter faster than if the stick was left whole), by very briefly microwaving ingredients like milk or sour cream to take off the chill, and by using a bowl of hot water to warm up the the whole eggs.
Frost your cupcakes using an offset spatula, a knife, or a piping bag. Or, as I did here, scoop the frosting into a gallon-sized plastic baggie, snip off the corner of the bag, and pipe the frosting onto the cupcakes in a spiral, starting from the outside perimeter and working towards the center. Piping the frosting as shown in these photos requires a lot more frosting than spreading it with a knife, so in that case, plan on making a double recipe of frosting.
For the complete recipe please click: https://www.fivehearthome.com/the-best-lemon-cupcakes-with-lemon-cream-cheese-frosting/
These Mini Oreo Cheesecakes are definitely one of my favorite Oreo desserts along with Oreo Cake. This recipe has already been re-pinned 150...
These Mini Oreo Cheesecakes are definitely one of my favorite Oreo desserts along with Oreo Cake. This recipe has already been re-pinned 150,000 times on Pinterest, and is catching up to my ever-popular Chocolate Covered Cheesecake Bites.
If you want a light and airy baked oreo cheesecake, then this recipe is for you.
These oreo cheesecake cupcakes are baked in a low-temperature oven to become fluffy and light. They’re perfect if you want a quick dessert idea to serve up at home.
They are particularly good for birthday parties or special occasions like Mother’s Day. We’ve packed them for school lunches and kids just love to show off the hidden oreo on the bottom.
Mix the cream cheese with the rest of the ingredients in a bowl to make the filling. Beating the ingredients together at high speed is what gives the fluffy texture, so get it nice and smooth!
We’ve also included crumbled oreo pieces in the filling for extra flavor – don’t worry, they soften up during baking.
Once you’ve finished making your filling, spoon it into each cup until they’re almost full…
Ingredients
- 12 Oreo cookies whole
- 6 Oreo cookies chopped
- 16 ounces cream cheese softened
- 1/2 cup granulated sugar
- 1/2 tsp vanilla extract
- 2 large eggs lightly beaten
- 1/2 cup sour cream
Instructions
- Preheat oven to 300°F. Line a standard 12-cup muffin pan with paper cups.
- Place one Oreo cookie into each paper cup.
- In a medium bowl, beat cream cheese, gradually adding sugar, vanilla, eggs, sour cream, mixing well after each addition.
- Stir in chopped cookies by hand.
- Spoon batter into muffin pan, filling each to almost the top.
- Divide batter evenly among cookie-lined cups, filling each almost to the top.
- Place in the lower third of the oven and bake for 25-30 minutes until firm in the middle.
- Remove from oven and transfer to cooling racks. Serve and enjoy!
For the complete recipe please click: https://tipbuzz.com/oreo-cheesecake-cups/
Hi, it’s Jenn, from Eat Cake For Dinner. I’m back again sharing one of my absolute favorite cupcake recipes with you. When I was young, I h...
Hi, it’s Jenn, from Eat Cake For Dinner. I’m back again sharing one of my absolute favorite cupcake recipes with you.
When I was young, I had never heard of, or seen, a red velvet cupcake. It wasn’t until I was an adult when I first discovered red velvet cake. Honestly, I think I first saw a red velvet cake on an episode of Paula Deen on T.V. and I had to try this interesting cake right away.
From the moment I first tasted red velvet cake, it instantly became my favorite and is still, to this day, my favorite flavor of cake.
There was a time when I was making a new red velvet cake recipe every weekend. I had to make up for lost time, right? I tried recipe after recipe and none compared to this one. It is a light cake with a beautiful red color and a slight chocolate flavor with a little tang from the buttermilk. Red velvet cake is not meant to have a super strong chocolate flavor.
I top these cupcakes with my go-to cream cheese frosting recipe. I prefer my cream cheese frosting to have more butter than cream cheese, but if you like a super strong cream cheese flavor, you can double the cream cheese and cut the amount of butter called for in half.
This has been my go-to red velvet cupcake recipe for years and years and I’m sure it will become your favorite too.
INGREDIENTS
- 3⅓ c. cake flour (not self-rising)
- ¾ c. (12 Tbl.) unsalted butter, room temperature
- 2¼ c. sugar
- 3 large eggs, room temperature
- 2 Tbl. liquid red food coloring
- 3 Tbl. unsweetened cocoa powder
- 1½ tsp. vanilla extract
- 1½ tsp. salt
- 1½ c. buttermilk
- 1½ tsp. white vinegar
- 1½ tsp. baking soda
- Cream Cheese Frosting:
- 1 c. (2 sticks) unsalted butter, room temperature
- 1 (8 oz.) pkg. cream cheese, room temperature
- ¼ tsp. salt
- 2 tsp. vanilla extract
- 4½ c. powdered sugar
- 1 Tbl. milk, plus more if needed
INSTRUCTIONS
- Preheat oven to 350 degrees. Line a muffin tin with paper liners and spray with cooking spray; set aside. In the bowl of a stand mixer, combine butter and sugar and mix on medium speed until very light and fluffy, about 5 minutes. Add the eggs, one at a time, beating well after each addition. In a small bowl, whisk the food coloring, cocoa powder and vanilla together; add to the butter/sugar mixture and mix well. Stir the salt into the buttermilk and add to the batter in three parts, alternating with the cake flour, starting and ending with flour. In a small bowl, stir together the vinegar and baking soda; add to the batter and mix well.
- Fill cupcake liners ⅔ full with batter and bake in preheated oven for 17-18 minutes or until a toothpick inserted in the center comes out clean. Do not over bake. Repeat with remaining cupcakes. Cool completely and top with Cream Cheese Frosting. Makes about 3½ dozen cupcakes.
- For the Cream Cheese Frosting: In a large bowl, mix together butter, cream cheese, salt and vanilla until smooth. Add powdered sugar, one cup at a time, beating well after each addition. If frosting is too thick, add a little milk. If you are planning to pipe the frosting onto the cupcakes, you want it thick enough to hold its shape. This makes enough frosting to pipe a big swirl on the top of each cupcake. I used a Wilton 1M piping tip.
- *If you do not want to pipe a large swirl onto each cupcake and prefer to spread a small layer on top instead, the amount of frosting can be cut in half.

For the complete recipe please click: https://therecipecritic.com/2017/02/best-red-velvet-cupcakes-cream-cheese-frosting/




Follow Us
Were this world an endless plain, and by sailing eastward we could for ever reach new distances